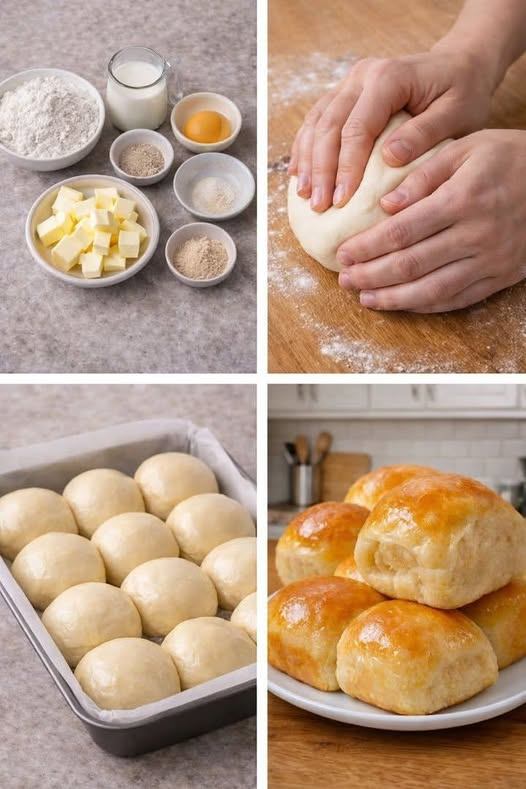
The Yeast Activation: Dissolve the yeast in warm water with a pinch of the sugar. Let it sit for 5–10 minutes until it is “foamy” and active.
The Milk Prep: Scald the milk (heat until tiny bubbles form at the edge), then let it cool until it is lukewarm. Pro-Tip: If the milk is too hot, it will kill the yeast; if too cold, the proteins won’t be “relaxed” enough for a soft roll.
The Dough Build: In a large bowl, combine the yeast mixture, lukewarm milk, sugar, melted butter, eggs, and salt. Gradually add the flour, mixing until a “soft and tacky” dough forms.
The Knead: Knead for 5–8 minutes until smooth. It should be elastic but still slightly “grippy” to the touch.
The First Rise: Place in a greased bowl, cover, and let rise in a warm spot for about 90 minutes, or until doubled in size.
The Shape: Punch down the dough. Roll out to 1-inch thickness and cut into squares or rectangles. Place on a greased baking sheet, allowing them to touch slightly for “pull-apart” sides.
The Second Rise: Let rise again for 45–60 minutes until they are “fat and puffy.”
The Bake: Bake at 350°F (175°C) for 12–15 minutes until the tops are a glowing golden brown.
The Finish: Brush “generously” with melted butter while still steaming.
Serving and Storage
Serving: These rolls are best served “immediately” while hot. They are essentially a vessel for honey cinnamon butter. They add a “clean” yet rich comfort to any meal, from steak to simple roasted chicken.
Storage: While best fresh, you can store these in an airtight bag for 2 days. To restore the “warm hug” feeling, wrap them in foil and heat in the oven at 300°F for 5 minutes. They also freeze beautifully—simply thaw and give them a quick toast!
Tips: Why “Scald” the Milk?
You might wonder why we don’t just use warm milk. Scalding milk is an old-fashioned “treasure” of a technique. Heating the milk to $82^{\circ}C$ ($180^{\circ}F$) deactivates certain whey proteins that can otherwise weaken the gluten structure. The result is a roll that rises higher and stays “soft and pillowy” for much longer. It is the difference between a “good” roll and a “legendary” one.
Variations: Customizing the Crust
The Garlic Herb: Instead of honey butter, brush the rolls with garlic-infused butter and a sprinkle of dried parsley.
The Cinnamon Roll Twist: Use this same dough as a base for cinnamon rolls; its high sugar and egg content makes it the perfect brioche-style dough.
The Sea Salt Topper: Sprinkle a few flakes of Maldon sea salt over the buttered tops for a “sweet-and-salty” gourmet finish.
Tips: The “Finger-Poke” Test
To know if your rolls are ready to go into the oven during the second rise, give one a very gentle poke with your finger. If the indentation stays or springs back very slowly, they are ready. If it springs back instantly, they need more time. This ensures they have maximum “airiness” and won’t be dense in the center.
Conclusion: A New Family Tradition
Mastering these Texas Roadhouse Style Rolls is a reminder that the best things in life are often made of flour, patience, and a little bit of butter. It is a dish that makes everyone at the table “lean back” and smile. Simple, nourishing for the soul, and absolutely satisfying—this recipe is a win. Enjoy your golden pillows of heaven!
Frequently Asked Questions
Can I use Bread Flour?
You can, but the rolls will be slightly “chewier.” For that iconic, “cake-like” softness, all-purpose flour is actually the preferred choice here.
My dough is too sticky, should I add more flour?
Add it one tablespoon at a time. The dough should be a little tacky; if you add too much flour, the rolls will become heavy and “bready” instead of light and airy.
How do I make the Honey Cinnamon Butter?
Whip 1 stick of softened butter with 1/4 cup powdered sugar, 1/4 cup honey, and 1 teaspoon of cinnamon until “soft and fluffy.” It is the non-negotiable partner for these rolls!