Sourdough Discard Brownies: Fudgy, Rich, and Zero-Waste
Introduction
There is something magical about the smell of warm brownies baking in the oven. When the rich chocolate aroma fills your kitchen, it feels like a cozy hug that brings instant comfort. Now imagine taking that same comforting feeling and adding a touch of sourdough discard to it. The result is a batch of fudgy, deep-flavored, and perfectly moist Sourdough Discard Brownies that you will fall in love with at the very first bite. This recipe gives you a delicious way to use your sourdough discard instead of throwing it away. It combines the tangy taste of sourdough with the sweetness of chocolate to create something truly special.
People love brownies because they are one of those desserts that never fail to please. Whether you like them chewy, gooey, or slightly cakey, brownies have the power to brighten your day. Adding sourdough discard makes the texture even more amazing. It creates a rich depth of flavor that regular brownies often lack. These brownies have a slight tang that balances the sweetness perfectly. They are soft on the inside, slightly crisp on the edges, and melt in your mouth. It is the kind of treat that makes everyone ask for seconds.
You can make these sourdough discard brownies for many reasons. Maybe you want to reduce food waste and use your leftover discard from your sourdough starter. Maybe you want to bake something comforting to share with family and friends. Or maybe you just crave something chocolatey after a long day. These brownies are also perfect for celebrations, small gatherings, or weekend baking fun. No matter the reason, this recipe will give you happiness in every bite. It is a simple pleasure that brings joy, warmth, and sweetness into your home.
Ingredients You Will Need
Here is a complete list of ingredients to make the best sourdough discard brownies. Each item plays an important role in making your brownies rich, soft, and full of flavor.
120 grams of unsalted butter (about half a cup)
180 grams of granulated sugar (about one cup)
100 grams of brown sugar (about half a cup, packed)
100 grams of dark chocolate (chopped or chips)
2 large eggs
1 teaspoon of vanilla extract
120 grams of sourdough discard (about half a cup)
60 grams of all-purpose flour (about half a cup)
30 grams of cocoa powder (about one third cup)
1 teaspoon of instant coffee (optional, but enhances chocolate flavor)
1 teaspoon of salt
100 grams of chocolate chunks or chips for topping (optional)
You can also add some extra ingredients if you like different flavors. For example, chopped walnuts, almonds, or hazelnuts add crunch. A few pieces of white chocolate or caramel chunks give sweetness. You can even sprinkle sea salt on top before baking for a fancy touch.
Step by Step Method
Follow these easy steps carefully. Each step is written in simple English so that even if you are new to baking, you can make these brownies with confidence.
Step 1: Prepare Your Baking Dish
Take a square baking pan about eight inches wide. Grease it with a little butter or line it with parchment paper so that the brownies do not stick. Preheat your oven to 175 degrees Celsius which is around 350 degrees Fahrenheit. This makes sure your oven is hot and ready when you are done mixing.
Step 2: Melt the Butter and Chocolate
In a medium heatproof bowl, add the butter and chopped dark chocolate. Place the bowl over a pot of hot water or microwave it in short intervals of 20 seconds. Stir after each interval until everything melts smoothly. The mixture should look glossy and thick. Set it aside for a few minutes to cool slightly.
Step 3: Mix in the Sugars
Add the granulated sugar and brown sugar to the melted butter and chocolate mixture. Stir well with a whisk or spoon until combined. The mixture will look a bit grainy at this stage, but that is normal. Mixing both sugars helps your brownies stay moist and gives them a rich caramel-like taste.
Step 4: Add Eggs and Vanilla Extract
Now add two eggs one at a time. Mix well after each egg until the batter becomes smooth and shiny. Add the vanilla extract and mix again. You will notice the texture turning thick and glossy. This is a sign that the sugars are dissolving properly into the mixture.
Step 5: Add Sourdough Discard
Next, add the sourdough discard to the bowl. Stir it gently into the batter until it blends completely. The discard adds a slight tangy flavor and helps create a soft chewy texture. It also gives the brownies a beautiful deep taste that makes them stand out.
Step 6: Combine Dry Ingredients
In another bowl, sift together the flour, cocoa powder, instant coffee, and salt. Sifting removes any lumps and makes the mixture lighter. Then, gently fold these dry ingredients into the wet mixture using a spatula. Be careful not to overmix. Stir just until you no longer see dry flour. Overmixing can make your brownies tough instead of soft.
Step 7: Add Extra Chocolate or Nuts
If you want extra chocolatey brownies, now is the time to fold in some chocolate chunks or chips. You can also add nuts for crunch. Mix them gently so that they spread evenly through the batter.
Step 8: Pour and Bake
Pour the batter into your prepared baking dish. Spread it evenly with a spatula so it bakes uniformly. Place it in the preheated oven and bake for about 25 to 30 minutes. Check after 25 minutes by inserting a toothpick in the center. If it comes out with a few moist crumbs, your brownies are ready. If it comes out wet with batter, bake for a few more minutes.
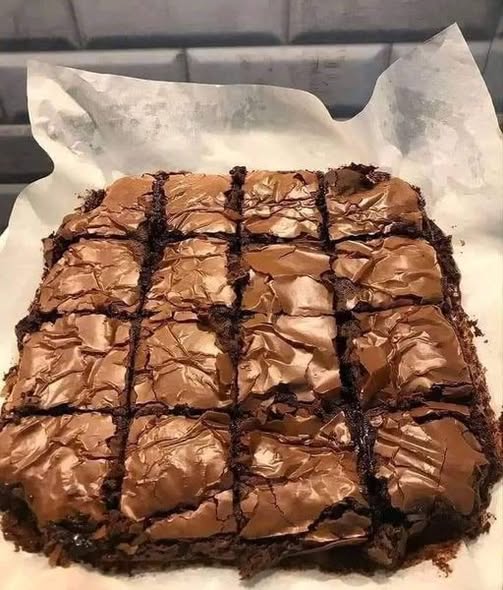
Step 9: Cool Before Cutting
Take the pan out of the oven and let the brownies cool completely in the pan. This step is very important because the brownies continue to cook as they cool. Cutting them too soon can make them fall apart. Once cooled, lift them out of the pan and cut them into neat squares.
Step 10: Enjoy
Your sourdough discard brownies are now ready to eat. They taste amazing on their own, but you can also serve them with ice cream, whipped cream, or a drizzle of chocolate syrup. Store leftovers in an airtight container for up to four days. You can even freeze them for longer storage.
Why This Recipe Is Special