Christmas Raspberry Cream CookiesIntroduction

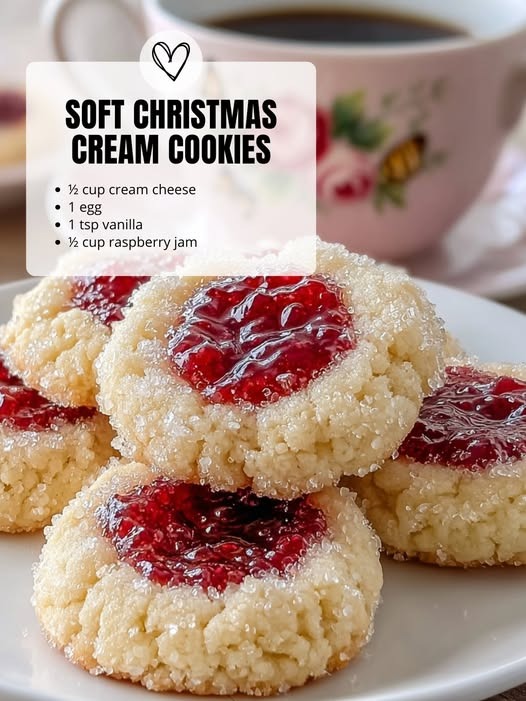
Christmas Raspberry Cream Cookies are like taking a snowy December morning, wrapping it in butter, sugar, and berries, and turning it into a soft, festive bite. These cookies bring together everything joyful about the holiday season: the warm aroma of vanilla, the tender melt-in-your-mouth texture of a cream-based dough, and the zing of raspberry filling that gives each bite a bright, fruity sparkle.

For many home bakers, holiday cookies are more than just dessert. They are tradition. They’re a love language. They’re the edible stories that families wait for each year. These raspberry cream cookies fit that role perfectly. With their soft centers, crisp edges, and pretty ruby-red accents, they look like something straight out of a Christmas bakery window. Yet the magic is that you can easily make them at home.

What sets this cookie apart is the creamy dough enriched with butter and cream cheese. This combination creates a tender crumb and subtle tang that balances beautifully with the sweet raspberry center. When baked, the cookies puff up slightly, becoming soft pillows with a jewel-like raspberry center that sparkles like a Christmas ornament.

Whether you’re preparing dessert for a holiday party, filling cookie boxes for friends and neighbors, or simply enjoying a cozy baking day, these cookies deliver festive comfort with every bite. They freeze well, store beautifully, and always impress.

This is the kind of cookie that feels nostalgic even if you’ve never made it before. And once you bake it, it becomes the treat everyone asks for every year.

Let’s bring this holiday cookie magic into your kitchen.

For the Cookies:
1 cup unsalted butter, softened

4 oz cream cheese, softened

1 cup granulated sugar

1 large egg

2 teaspoons pure vanilla extract

1 teaspoon almond extract (optional but festive)

2 ¾ cups all-purpose flour

1 teaspoon baking powder

½ teaspoon baking soda

¼ teaspoon salt

For the Raspberry Filling:
½ cup raspberry jam or seedless raspberry preserves

1 tablespoon cornstarch (optional, for thickness)

For Decoration (Optional but pretty):
Powdered sugar

Christmas sprinkles

White chocolate drizzle

Instructions
Step 1: Cream the butter and cream cheese
In a large mixing bowl, beat the softened butter and cream cheese together until smooth, fluffy, and pale. This step is essential for achieving that melt-in-your-mouth cookie texture. The mixture should look creamy and airy.

Step 2: Add sugar and beat until fluffy
Add the granulated sugar to the bowl and continue mixing. The sugar should dissolve into the fat mixture, creating a smooth base. Beat for 2–3 minutes until the mixture becomes light and whipped.

Step 3: Add the egg and flavor extracts
Mix in the egg, vanilla extract, and almond extract if you’re using it. Almond adds a nostalgic Christmas flavor, similar to classic bakery cookies. Mix until everything is fully combined, scraping down the bowl as needed.

Step 4: Incorporate the dry ingredients
In a separate bowl, whisk together the flour, baking powder, baking soda, and salt. Add the dry ingredients slowly into the wet mixture, mixing until just combined. The dough should be soft but not sticky. If it feels too sticky, chill for 15–20 minutes.

Step 5: Shape, fill, and bake
Preheat your oven to 350°F (175°C).
Line baking sheets with parchment paper.

Roll the dough into balls (about 1 tablespoon each). Place on the baking sheet and gently press the center of each ball with your thumb or the back of a small spoon to create an indent.

Fill the indent with about ½ teaspoon raspberry jam. Don’t overflow — a little goes a long way.

Bake for 10–12 minutes until the edges are just set and lightly golden. Cool on a wire rack.

Ingredients
For the Cookies:

1 cup unsalted butter, softened

4 oz cream cheese, softened

1 cup granulated sugar

1 large egg

2 teaspoons pure vanilla extract

1 teaspoon almond extract (optional but festive)

2 ¾ cups all-purpose flour

1 teaspoon baking powder

½ teaspoon baking soda

¼ teaspoon salt

For the Raspberry Filling:

½ cup raspberry jam or seedless raspberry preserves

1 tablespoon cornstarch (optional, for thickness)

For Decoration (Optional but pretty):

Powdered sugar

Christmas sprinkles

White chocolate drizzle

Preparation

Read more

Strawberry Cheesecake Turnovers – Flaky, Fruity & Creamy Dessert

Introduction
If you’re searching for a dessert that combines flaky pastry, creamy cheesecake, and the sweet freshness of strawberries, Strawberry Cheesecake Turnovers are an irresistible choice. These handheld desserts are perfect for brunches, afternoon treats, or a show-stopping addition to any dessert table. With golden, buttery pastry pockets filled with a luscious mixture of cream cheese, sugar, and strawberries, every bite offers the perfect harmony of textures and flavors.

These turnovers are surprisingly easy to make, whether you use store-bought puff pastry or make your own. The combination of tangy cream cheese with sweet strawberries is classic, and the flakiness of the pastry adds a delightful crunch. They are perfect for impressing guests or simply treating yourself to a bakery-quality dessert at home. This guide will walk you through every step, with tips, variations, and serving suggestions for creating the perfect Strawberry Cheesecake Turnovers.

Ingredients
For the Pastry:

1 sheet puff pastry (thawed if frozen)
1 egg, beaten (for egg wash)
For the Cheesecake Filling:

4 oz cream cheese, softened
2 tbsp granulated sugar
1 tsp vanilla extract
For the Strawberry Filling:

½ cup fresh strawberries, diced (or ½ cup strawberry preserves/jam)
1 tbsp granulated sugar (if using fresh strawberries)
Optional Glaze:

½ cup powdered sugar
1-2 tsp milk
¼ tsp vanilla extract
Preparation
Step 1: Preheat Oven
Preheat your oven to 400°F (200°C). Line a baking sheet with parchment paper and set aside.

Step 2: Prepare the Filling
In a small bowl, mix softened cream cheese, sugar, and vanilla until smooth. In another bowl, toss diced strawberries with 1 tablespoon sugar if using fresh berries.

Step 3: Prepare the Puff Pastry
Roll out the puff pastry on a lightly floured surface to smooth edges. Cut the sheet into 4 equal squares (or 6 for smaller turnovers).

Step 4: Assemble the Turnovers
Place 1-2 tablespoons of cream cheese mixture in the center of each puff pastry square. Add a spoonful of strawberries on top. Fold the pastry over the filling to form a triangle or rectangle, pressing the edges with a fork to seal.

Step 5: Brush with Egg Wash and Bake
Brush the top of each turnover with the beaten egg. Bake for 15-20 minutes or until golden brown and puffed. Remove from the oven and allow to cool slightly.

Step 6: Optional Glaze
If desired, whisk together powdered sugar, milk, and vanilla to make a glaze. Drizzle over the slightly cooled turnovers before serving.

Variation
Chocolate Strawberry Cheesecake Turnovers: Add mini chocolate chips to the cream cheese filling.
Mixed Berry Turnovers: Combine strawberries with blueberries or raspberries for a mixed berry version.
Nutty Twist: Sprinkle crushed nuts, such as almonds or pecans, on top of the filling before folding.
Mini Turnovers: Make bite-sized turnovers for parties or brunch spreads.
Cooking Note
Make sure puff pastry is cold before baking; this helps it puff up beautifully.
Do not overfill the turnovers, or the filling may leak while baking.
Egg wash ensures a golden, glossy finish.
Serving Suggestions
Serve warm with a scoop of vanilla ice cream or whipped cream for extra indulgence.
Perfect for breakfast, brunch, or a dessert table at parties.
Great for packed snacks, picnics, or tea-time treats.
Tips
Chill turnovers for 10-15 minutes before baking if the pastry becomes too soft during assembly.
Use a fork to press and seal edges to prevent filling from leaking.
Store leftovers in an airtight container in the refrigerator for 2-3 days. Reheat in a warm oven before serving.
Prep Time:
15 minutes

Cooking Time:
18-20 minutes

Total Time:
35 minutes

Nutritional Information (per turnover, serves 4)
Calories: 250 kcal
Protein: 4 g
Fat: 14 g
Carbohydrates: 28 g
Sodium: 120 mg
FAQs
Q: Can I use frozen strawberries?
A: Yes, thaw and drain well to avoid excess moisture in the turnovers.

Q: Can I make these ahead of time?
A: Assemble the turnovers and refrigerate for up to 24 hours before baking.

Q: Can I freeze the turnovers?
A: Yes, freeze unbaked turnovers on a baking sheet, then transfer to a freezer bag. Bake directly from frozen with a few extra minutes added.

Q: Can I use cream cheese frosting instead of glaze?
A: Yes, drizzle cream cheese frosting over cooled turnovers for a richer finish.

Q: Can I use phyllo dough instead of puff pastry?
A: You can, but be careful as phyllo is thinner and may require multiple layers to hold the filling.

Conclusion

Read more

Million Dollar Cream Cheese Pound Cake

Introduction
There’s something almost mythic about a Million Dollar Cream Cheese Pound Cake—the kind of recipe that feels like it’s been whispered down through generations, kept in handwritten notebooks, and only brought out for occasions that matter. This cake is everything its name promises: rich, indulgent, buttery, and soft in a way that sticks with you. It’s the kind of dessert that doesn’t need frosting, filling, or flashy toppings. It stands on its own, proud and golden, with a tight crumb that slices like velvet and melts the moment it hits your tongue.

When you bake this cake, your kitchen transforms. The aroma is old-school, comforting—like warm vanilla, sweet cream, and browned butter drifting through the air. It’s the smell of childhood holidays, Sunday suppers, and staying up late with the oven light on because you don’t want to miss that first perfect rise. Pound cake isn’t just dessert. It’s memory, nostalgia, quiet ceremony.

What makes this one different is the cream cheese. It doesn’t shout. It hums quietly in the background, giving the cake an unbelievable tenderness and richness without making it tangy or overcomplicated. Combined with a classic pound cake foundation—eggs, butter, sugar, and flour—you get balance, heft, and luxury in one bite. It’s the kind of dessert that makes people close their eyes for a second.

Whether you’re baking it for the holidays, gifting it to someone who deserves something decadent, or just craving a slice of something old-fashioned and perfect, this Million Dollar Cream Cheese Pound Cake hits every note. It’s simple, honest, indulgent, and worth every single bite.

Why You’ll Love This Recipe
Velvety, tight crumb – The texture is dense yet soft, exactly what a perfect pound cake should be.
No frosting needed – Its rich flavor stands on its own.
Reliable and forgiving – A great recipe for beginners and seasoned bakers alike.
Perfect for gifting – Wrap slices or the whole cake for holidays or special occasions.
Stays fresh for days – The cream cheese keeps it moist longer.
Versatile – Pair with fruit, whipped cream, ice cream, or enjoy plain.
Ingredients
Core Ingredients
1 1/2 cups (3 sticks) unsalted butter, softened
8 oz cream cheese, softened
3 cups granulated sugar
6 large eggs, room temperature
3 cups all-purpose flour
1/2 tsp salt
1 tbsp vanilla extract (or 1/2 vanilla + 1/2 almond extract)
Instructions/Method

Read more

Grandma’s Chocolate Pie – Old-Fashioned Creamy Southern Classic

Introduction Grandma’s Chocolate Pie is the kind of dessert that instantly brings back memories of cozy kitchens, handwritten recipe cards, and family gatherings around the table. This classic pie is rich, smooth, and deeply chocolatey, with a custard-style filling that sets perfectly inside a flaky pie crust. It’s simple, comforting, and made with pantry staples—just … Read more

Homemade Baileys Irish Cream Perfect Christmas Gift!

There’s something incredibly special about giving homemade gifts during the holidays, and this Homemade Baileys Irish Cream is the ultimate festive present that friends and family will absolutely adore. Rich, creamy, and luxuriously smooth, this copycat recipe rivals the store-bought version at a fraction of the cost. Whether you’re enjoying it over ice, stirring it … Read more

Banana Pudding Cup – Creamy No-Bake Individual Dessert

Introduction

Banana Pudding Cups are a classic, comforting dessert transformed into perfectly portioned individual servings. Inspired by traditional Southern banana pudding, these cups deliver layers of creamy vanilla pudding, fresh ripe bananas, and soft vanilla wafers—all without turning on the oven. They’re simple, nostalgic, and incredibly satisfying.

What makes banana pudding cups so popular is their convenience. They’re easy to assemble, require minimal ingredients, and can be made ahead of time, making them ideal for parties, potlucks, holidays, or weeknight desserts. Served in clear cups or jars, they also look beautiful, showing off each delicious layer.

This dessert strikes the perfect balance between creamy and light, sweet but not overpowering. The bananas add natural sweetness, the wafers soften into a cake-like texture, and the pudding brings everything together into one smooth, comforting bite. Whether you grew up eating banana pudding or you’re discovering it for the first time, these cups are guaranteed to become a favorite.

Ingredients

2 cups cold milk

1 box (3.4 oz) instant vanilla pudding mix

1 cup heavy whipping cream

2 tablespoons powdered sugar

1 teaspoon vanilla extract

3–4 ripe bananas, sliced

2 cups vanilla wafers (whole or crushed)

Preparation
Step 1: Prepare the Pudding Base

In a medium bowl, whisk together the cold milk and instant vanilla pudding mix for about 2 minutes, until thickened. Set aside to firm up slightly while preparing the other components.

Step 2: Make the Whipped Cream

In a separate bowl, beat the heavy whipping cream with powdered sugar and vanilla extract until stiff peaks form. This adds lightness and richness to the pudding cups.

Step 3: Combine Pudding and Cream

Gently fold half or all of the whipped cream into the prepared pudding, depending on how light you want the texture. Folding creates a fluffy, mousse-like consistency without deflating the cream.

Step 4: Assemble the Cups

In clear dessert cups or jars, start with a layer of vanilla wafers at the bottom. Add a layer of banana slices, followed by a generous spoonful of pudding mixture. Repeat the layers until the cups are filled, finishing with pudding on top.

Step 5: Chill Before Serving

Cover the cups and refrigerate for at least 2 hours. This allows the wafers to soften and the flavors to blend perfectly.

Variation

Chocolate Banana Pudding Cups: Use chocolate pudding instead of vanilla.

Banana Cheesecake Cups: Fold softened cream cheese into the pudding mixture.

Peanut Butter Banana Cups: Add a swirl of peanut butter between layers.

Strawberry Banana Cups: Add sliced strawberries for a fruity twist.

Sugar-Free Version: Use sugar-free pudding and light whipped topping.

Cooking Note

Bananas naturally brown over time. For best results, assemble the cups close to serving time or lightly toss banana slices in lemon juice to slow oxidation. Use ripe but firm bananas for the best texture and flavor.

Serving Suggestions

Read more

Crockpot Steak Bites

These easy slow-cooked steak bites are savory, tender, and bursting with flavor. Cooked low and slow in a rich soy-Worcestershire-garlic sauce, they’re perfect served over mashed potatoes, rice, noodles, or simply enjoyed right from the crockpot. A simple yet impressive dish from deesviral! Introduction Crockpot Steak Bites are one of those recipes that look and … Read more

Irresistible 5 Cheese Crack and Cheese Recipe

Table of Contents
Introduction
Why You’ll Love This Recipe
Ingredients
Instructions
Tips & Variations
Note
Serving Suggestions
Nutrition Information
User Reviews/Comments
FAQs
Conclusion
Introduction
Mac and cheese has always been the people’s comfort food. A dish that never needed an introduction, because its creamy, cheesy, golden presence always spoke for itself. But what if we took that simple pleasure and amplified it to something outrageous? Something worthy of being called addictive—like “crack”—because once you try it, there’s no turning back.

This 5 Cheese Crack and Cheese is not for the faint-hearted. It’s rich, it’s bold, and it doesn’t apologize for any of it. We’re talking a medley of cheeses that work together like a symphony—sharp cheddar, gooey mozzarella, tangy gouda, punchy parmesan, and creamy fontina. Each brings its own note to this harmony of decadence.

Think of it as the rock ‘n roll version of your childhood mac. It’s baked to perfection, with a golden crust that gives way to a bubbling, molten core. It’s got the punch of garlic, the heat of paprika, and a hint of crunch from a buttery topping that seals the deal.

This isn’t just dinner. It’s a full-blown experience. Whether you’re serving it at a holiday table, bringing it to a potluck, or just feeding your midnight cravings, this recipe delivers every time. Ready to lose yourself in the madness? Let’s cook.

5 Cheese Crack and Cheese
Why You’ll Love This Recipe
Uses five bold, distinct cheeses for maximum flavor
Incredibly creamy and indulgent—true comfort food
Baked to perfection with a crispy, golden crust
Simple ingredients, huge payoff
Great for parties, holidays, or next-level leftovers
Can be prepped ahead and reheated like a dream
Kid-approved but adult-loved
Ingredients
1 lb elbow macaroni
2 tbsp unsalted butter
2 tbsp all-purpose flour
2 cups whole milk
1 cup heavy cream
1 tsp garlic powder
1 tsp smoked paprika
Salt and pepper to taste
1 cup shredded sharp cheddar
1 cup shredded mozzarella
1 cup shredded gouda
1/2 cup grated parmesan
1 cup shredded fontina
1/2 cup panko breadcrumbs
2 tbsp melted butter
Instructions
Boil Pasta: Cook the macaroni in salted water until al dente. Drain and set aside.
Make the Roux: In a large pot, melt butter over medium heat. Whisk in the flour and cook for 1–2 minutes.
Add Dairy: Gradually whisk in the milk and cream until smooth. Cook until slightly thickened.
Season It: Stir in garlic powder, paprika, salt, and pepper.
Cheese Party: Add all five cheeses (reserve a handful for topping). Stir until melted and smooth.
Combine Pasta: Fold the drained macaroni into the cheese sauce until well-coated.
Prep for Baking: Pour into a greased 9×13 inch baking dish. Sprinkle with reserved cheese.
Breadcrumb Topping: Mix melted butter and panko, then sprinkle over the top.
Bake: Bake at 375°F (190°C) for 20–25 minutes until golden and bubbly.
Cool & Serve: Let rest 5 minutes before serving.
Tips & Variations
Spicy Kick: Add chopped jalapeños or a pinch of cayenne for heat.
Protein Boost: Mix in cooked bacon or shredded chicken.
Gluten-Free: Use GF pasta and breadcrumbs.
Cheese Swap: Sub Gruyère or Brie for fontina if needed.
Make Ahead: Assemble, cover, and refrigerate up to 2 days before baking.

Note
Don’t overcook the pasta before baking—it’ll get mushy. Al dente is your friend.

Serving Suggestions
Serve with a crisp green salad or roasted vegetables for balance.
Pair with BBQ ribs or fried chicken for a full soul-food spread.
Top with hot sauce or sriracha for an extra kick.
Leftovers make killer grilled cheese or mac & cheese balls.
Nutrition Information
Per Serving (based on 8 servings):

Calories: ~620
Fat: 39g
Saturated Fat: 22g
Carbohydrates: 45g
Protein: 21g
Sodium: 610mg
Fiber: 2g
Sugar: 4g
User Reviews/Comments
Samantha T. – “Made this for Friendsgiving and it was the first dish gone. Everyone asked for the recipe. Absolutely killer.”

Devon M. – “I added bacon bits and used spicy gouda—total flavor bomb. Will be making again for game day.”

Rina J. – “The texture and flavor are on point. Fontina was a great touch. Next time, I’ll try it with truffle oil.”

FAQs
Can I use fewer cheeses?
Sure, but it won’t be the same beast. Aim for at least three types to keep that depth.

Can I make it ahead of time?
Absolutely. Assemble and store in the fridge. Bake when ready to serve.

What’s the best pasta for this dish?
Elbow macaroni is classic, but shells or cavatappi hold sauce well too.

Is this freezer-friendly?
Yes, freeze before baking for best results. Thaw overnight, then bake as usual.

How do I reheat leftovers?
Add a splash of milk and cover when reheating in the oven or microwave. Keeps it moist.

Can I make this without baking?
Yes, it works stovetop too—just skip the breadcrumb topping.

Is there a low-fat version?
You can swap cream for milk and reduce cheese, but why mess with perfection?

What’s fontina cheese like?
Creamy, nutty, melty—it ties the whole dish together.

Conclusion

Read more

Crockpot Mac and Cheese

Crockpot Mac and Cheese is the ultimate comfort food. Creamy, cheesy, and incredibly easy to make, this slow cooker recipe ensures that you’ll have a rich and satisfying mac and cheese ready to enjoy with minimal effort. Ingredients: 16 ounces (1 pound) elbow macaroni 4 cups shredded sharp cheddar cheese 2 cups shredded mozzarella cheese … Read more

Southern Caramel Pound Cake

Introduction
A true Southern classic, the Southern Caramel Pound Cake is rich, buttery, dense, and topped with a silky caramel icing that melts right into the warm cake. This dessert has deep roots in Southern kitchens, where caramel cake has long been a centerpiece for Sunday dinners, celebrations, holidays, and potlucks. Its slow-cooked caramel icing is what makes it unforgettable — smooth, golden, and perfectly sweet.

If you want a dessert that feels nostalgic, comforting, and impressive enough for gatherings, this pound cake delivers on every level. It slices beautifully, tastes even better the next day, and fills the house with the warm aroma of butter and caramel. This is the cake people ask you to make again and again.

Ingredients

For the Pound Cake:
1 cup unsalted butter, softened

½ cup shortening

3 cups granulated sugar

5 large eggs

3 cups all-purpose flour

1 cup whole milk

1 tbsp vanilla extract

1 tsp baking powder

½ tsp salt

For the Caramel Icing:
½ cup unsalted butter

1 cup brown sugar

½ cup whole milk

2 cups powdered sugar

1 tsp vanilla extract

Step 1: Cream the butter, shortening & sugar
Mix until light and fluffy to create the perfect pound cake foundation.

Step 2: Add the eggs
Add eggs one at a time to ensure a smooth and rich batter.

Step 3: Combine the dry ingredients
Whisk flour, baking powder, and salt in a separate bowl.

Step 4: Add dry ingredients alternately with milk
Alternate flour mixture and milk into the batter, ending with flour. Add vanilla.

Step 5: Bake the cake
Pour into a greased Bundt pan and bake at 325°F (163°C) for 75–90 minutes. Cool completely.

Step 6: Make the caramel icing
Melt butter, add brown sugar, and cook gently until melted. Add milk, boil 2 minutes, remove from heat. Whisk in powdered sugar and vanilla until smooth.

Step 7: Glaze the cake
Pour warm caramel icing over the cake so it sinks perfectly into every groove.

Instructions
Step 1: Cream the butter, shortening & sugar
Mix until light and fluffy to create the perfect pound cake foundation.

Step 2: Add the eggs
Add eggs one at a time to ensure a smooth and rich batter.

Step 3: Combine the dry ingredients
Whisk flour, baking powder, and salt in a separate bowl.

Step 4: Add dry ingredients alternately with milk
Alternate flour mixture and milk into the batter, ending with flour. Add vanilla.

Step 5: Bake the cake
Pour into a greased Bundt pan and bake at 325°F (163°C) for 75–90 minutes. Cool completely.

Step 6: Make the caramel icing
Melt butter, add brown sugar, and cook gently until melted. Add milk, boil 2 minutes, remove from heat. Whisk in powdered sugar and vanilla until smooth.

Step 7: Glaze the cake
Pour warm caramel icing over the cake so it sinks perfectly into every groove.

Ingredients

Read more